Getting started with Linux and BusyBox for RISC-V on QEMU
February 11, 2023
In this blog post, we will discuss emulating 64-bit RISC-V system on QEMU and running Linux and BusyBox on this system. We’ll explore step-by-step how to build Linux kernel, QEMU and BusyBox for 64-bit RISC-V target. There is a guide from RISC-V foundation on that topic, but it doesn’t cover many important points, such as rootfs creation.
Sources
We will assume that at some point we are going to explore, reconfigure, debug or even modify the Linux/BusyBox/QEMU source code, so we will build everything from source:
git clone git://git.kernel.org/pub/scm/linux/kernel/git/torvalds/linux.git
git clone git@gitlab.com:qemu-project/qemu.git
git clone git://git.busybox.net/busybox
注:使用上面的链接下载qemu源码时,会显示"Permission denied"的错误,建议使用
git clone https://github.com/qemu/qemu.git
代替。
Tools
Here and below we will assume that we are on Ubuntu 22.04. In any way, in today’s world, we can make almost any popular environment in two lines:
docker pull ubuntu:22.04
docker run -ti --rm -v $(pwd):/data ubuntu:22.04 /bin/bash
Host tools
For being able to build host programs we need a tools and some libraries for the host:
apt-get update
apt-get install -y build-essential python3 ninja-build pkg-config libglib2.0-dev libpixman-1-dev libslirp-dev flex bison bc file device-tree-compiler
Target tools
Since the target architecture (RISC-V 64-bit) is different from the host architecture, we need a toolchain for cross-compilation:
apt-get install -y gcc-riscv64-linux-gnu binutils-riscv64-linux-gnuLinux
The following commands build Linux kernel for RISC-V with default configuration:
cd linux
mkdir build
make ARCH=riscv CROSS_COMPILE=riscv64-linux-gnu- O=build defconfig
make ARCH=riscv CROSS_COMPILE=riscv64-linux-gnu- O=build -j$(nproc)
cd -
注1:编译的最终配置保存在文件
build/.config文件中,make menuconfig O=build命令修改的配置也保存到这个文件中。注2:由于上面编译时指定了构建目录为
build,所以在make menuconfig时也需要指定输出目录,即make menuconfig O=build,不然会报"The source tree is not clean"的错误。注3:上面第3行是使用
arch/riscv/configs/defconfig文件进行构建的,arch=riscv指定了arch/riscv/configs目录,defconfig指定了使用该目录下的defconfig文件。
We have obtained linux/build/arch/riscv/boot/Image file with Linux kernel for RISC-V 64-bit:
$ file -b linux/build/arch/riscv/boot/Image
MS-DOS executable PE32+ executable (EFI application) RISC-V 64-bit (stripped to external PDB)
QEMU
The following commands build QEMU variant which can emulate RISC-V 64-bit target:
cd qemu
./configure --enable-debug --target-list=riscv64-softmmu --enable-slirp
make -j`nproc`
cd -
注:在运行上面的
configure命令时,可能缺少一些依赖库,可以参照下列命令安装一些缺失的库:pip install tomli
pip install sphinx
pip install sphinx_rtd_theme
pip install ninja
apt install libglib2.0-dev
如果遇到报“Python's ensurepip module is not found.”的错误,需要安装python3-venv库,命令如下:
apt install python3-venv
Now we have qemu/build/qemu-system-riscv64. It can directly boot our Image:
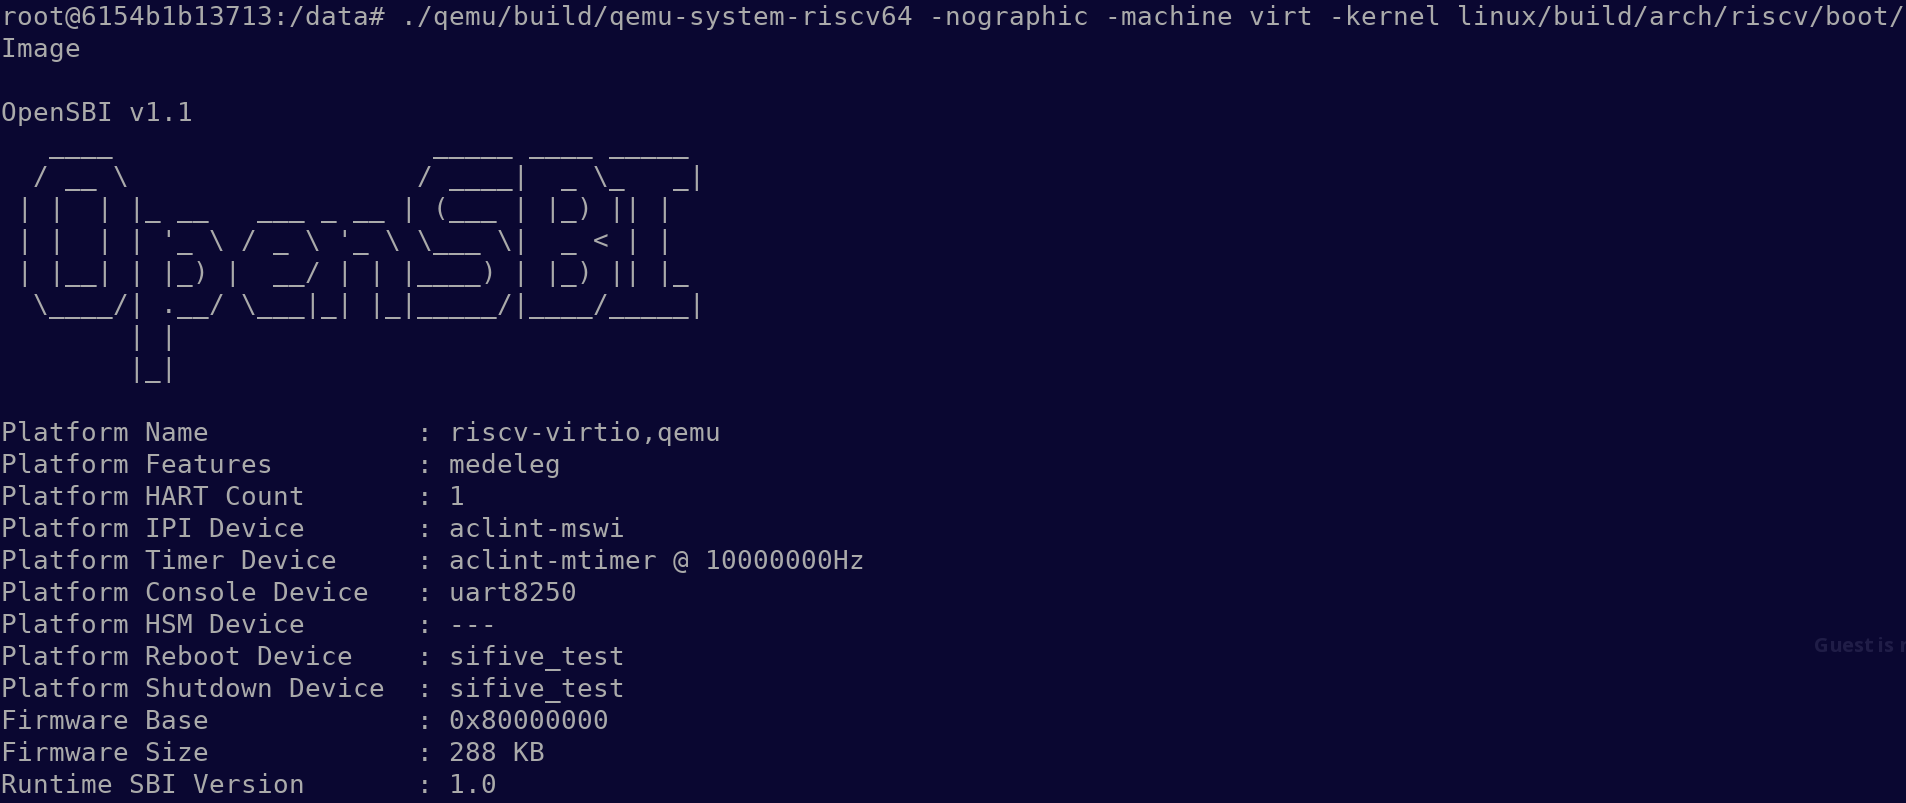
./qemu/build/qemu-system-riscv64 -nographic -machine virt -kernel linux/build/arch/riscv/boot/ImageAt first, OpenSBI is started:
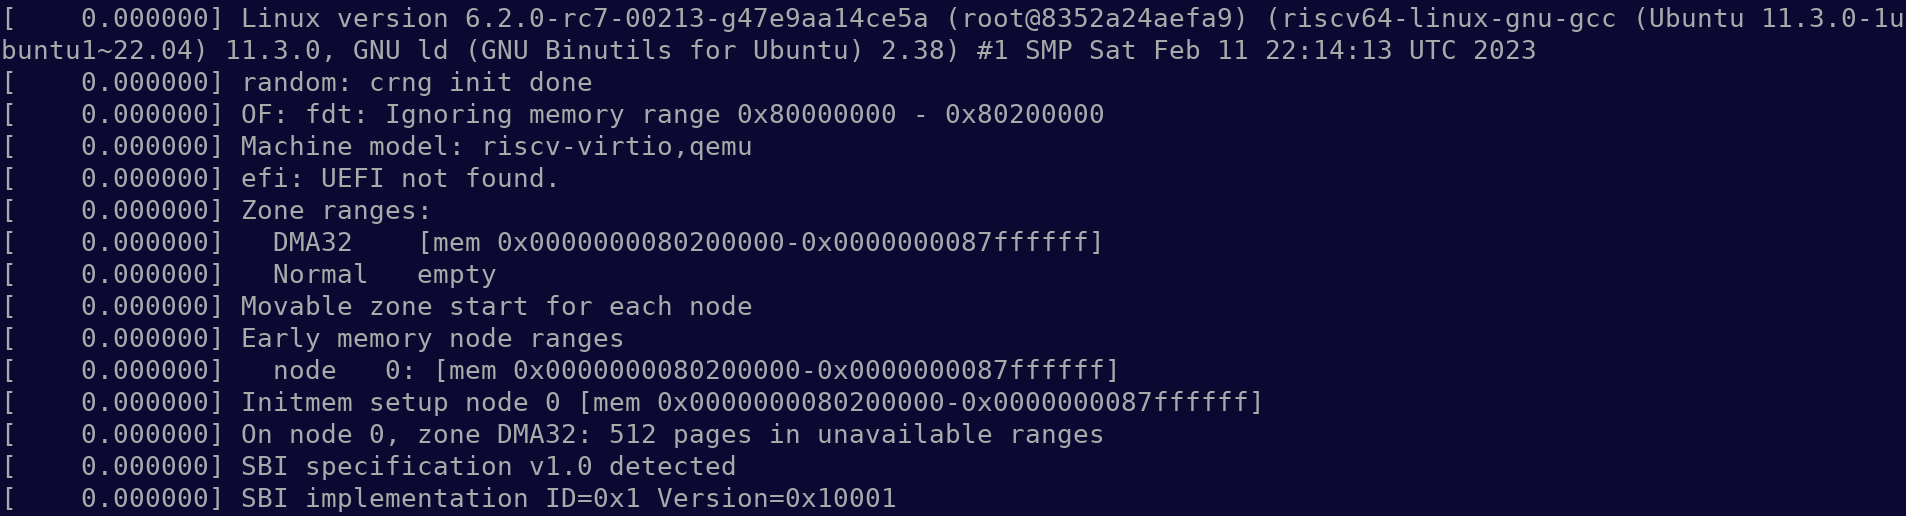
Then Linux kernel is booted:
Unfortunately it ends with kernel panic because we didn’t provide a block device for a filesystem mount:
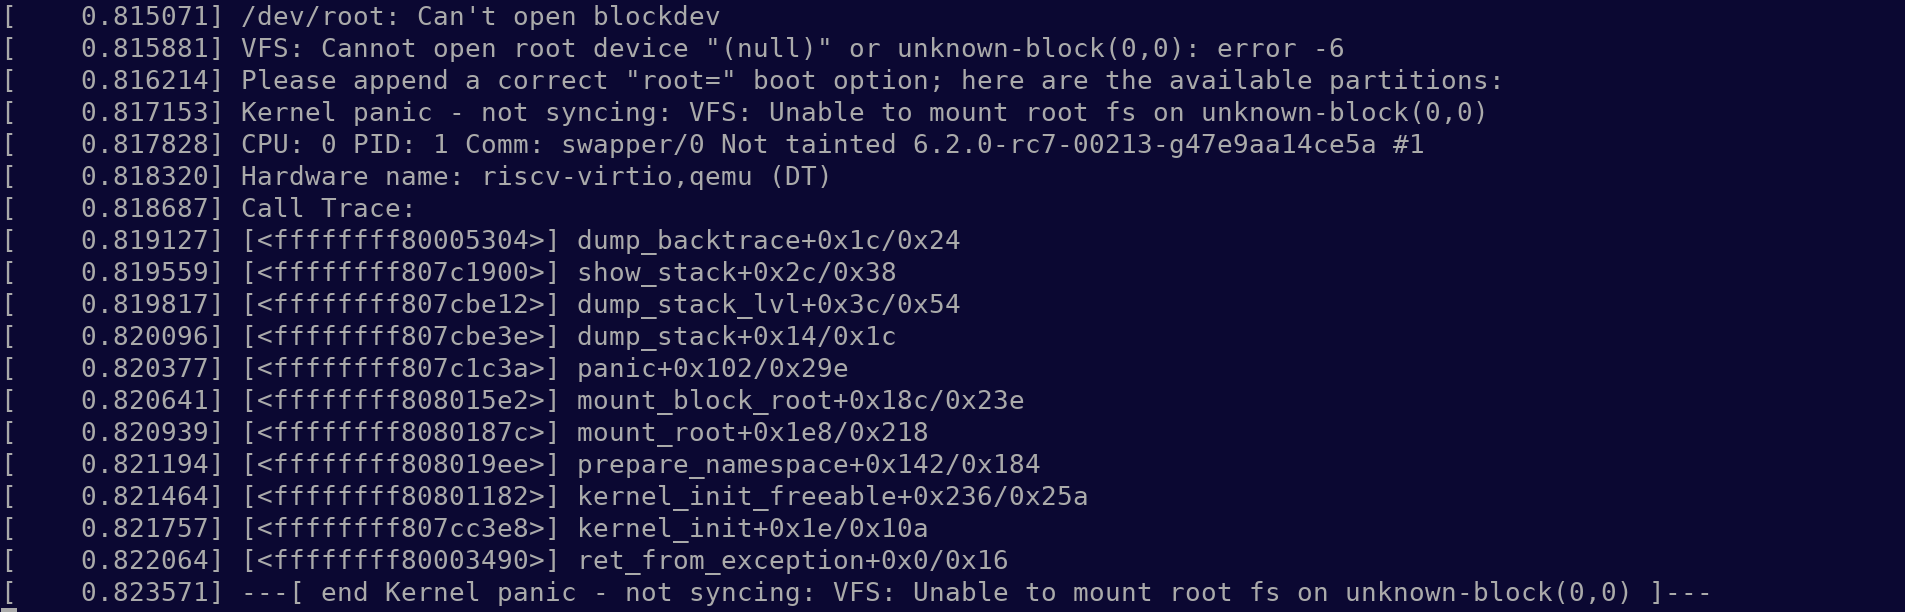
Press Ctrl-A then X to exit from QEMU. What we saw above means that we need to create a proper disk image. It is best if it has init and other basic programs. We will use BusyBox for this.
BusyBox
The following commands build BusyBox for RISC-V with default configuration:
CROSS_COMPILE=riscv64-linux-gnu- make -C busybox defconfig
CROSS_COMPILE=riscv64-linux-gnu- make -C busybox -j $(nproc)
But it has to be put somewhere, so let’s create an empty 256M image with ext4 filesystem:
dd if=/dev/zero of=rootfs.img bs=1M count=256
mkfs.ext4 rootfs.img
We can mount it and install BusyBox into it:
mkdir -p rootfs
mount rootfs.img rootfs
CROSS_COMPILE=riscv64-linux-gnu- LDFLAGS=--static make -C busybox install CONFIG_PREFIX=../rootfs
注1:上面的mount命令需要以root权限运行,不然会报类似"mount: rootfs: failed to setup loop device for rootfs.img."这样的错误。
We use LDFLAGS=--static to obtain static binary. In addition to the BusyBox itself, we should also create following files and directories inside rootfs:
cd rootfs
mkdir -p proc sys dev etc/init.d
touch etc/fstab
echo '#!/bin/sh' > etc/init.d/rcS
chmod +x etc/init.d/rcS
cd -
Generally speaking, etc/init.d/rcS is a script for initializing the system during the boot process, setting up the environment and executing other startup scripts, but we can leave it empty. Now we can unmount rootfs:
umount rootfsWe have obtained a disk image with ext4 and BusyBox:
$ file -b rootfs.img
Linux rev 1.0 ext4 filesystem data, UUID=83897434-65d1-48c3-9742-6d4fc0376542 (extents) (64bit) (large files) (huge files)
Running BusyBox in QEMU
I would recommend to use the following script for futher experiments:
#!/usr/bin/bash -x

KERNEL=linux/build/arch/riscv/boot/Image
DRIVE=rootfs.img

./qemu/build/qemu-system-riscv64 \
    -nographic \
    -machine virt \
    -kernel $KERNEL \
    -append "root=/dev/vda rw console=ttyS0" \
    -drive file=$DRIVE,format=raw,id=hd0 \
    -device virtio-blk-device,drive=hd0 \
    $*
注:如果运行上面的命令出现
"qemu-system-riscv64: -drive file=rootfs.img,format=raw,id=hd0: Drive 'hd0' is already in use because it has been automatically connected to another device (did you need 'if=none' in the drive options?)"
这样的报错时,需要在上面倒数第3行末尾加上 if=none 选项,即改为
-drive file=$DRIVE,format=raw,id=hd0,if=none \
原因:
The error message indicates that the drive
hd0is being automatically connected to another device by QEMU, but you are explicitly trying to attach it to avirtio-blk-device. This conflict occurs because QEMU automatically assigns the drive to a default device unless explicitly instructed otherwise.To fix this issue, you need to use the
if=noneoption in the-driveargument, which prevents QEMU from automatically attaching the drive to a default device.Explanation of the Fix:
if=nonein-drive: This tells QEMU not to automatically connect the drivehd0to any default device, leaving it available for manual connection using the-deviceoption.- Explicitly specifying
-device virtio-blk-device,drive=hd0: This connects thehd0drive (which you defined earlier) to thevirtio-blk-device.Why This Works:
The
if=noneoption prevents QEMU from auto-connecting the drive, so there won’t be a conflict when you manually attach it to avirtio-blk-device.After applying this fix, the error should no longer occur, and your QEMU system should boot correctly with the specified root filesystem.
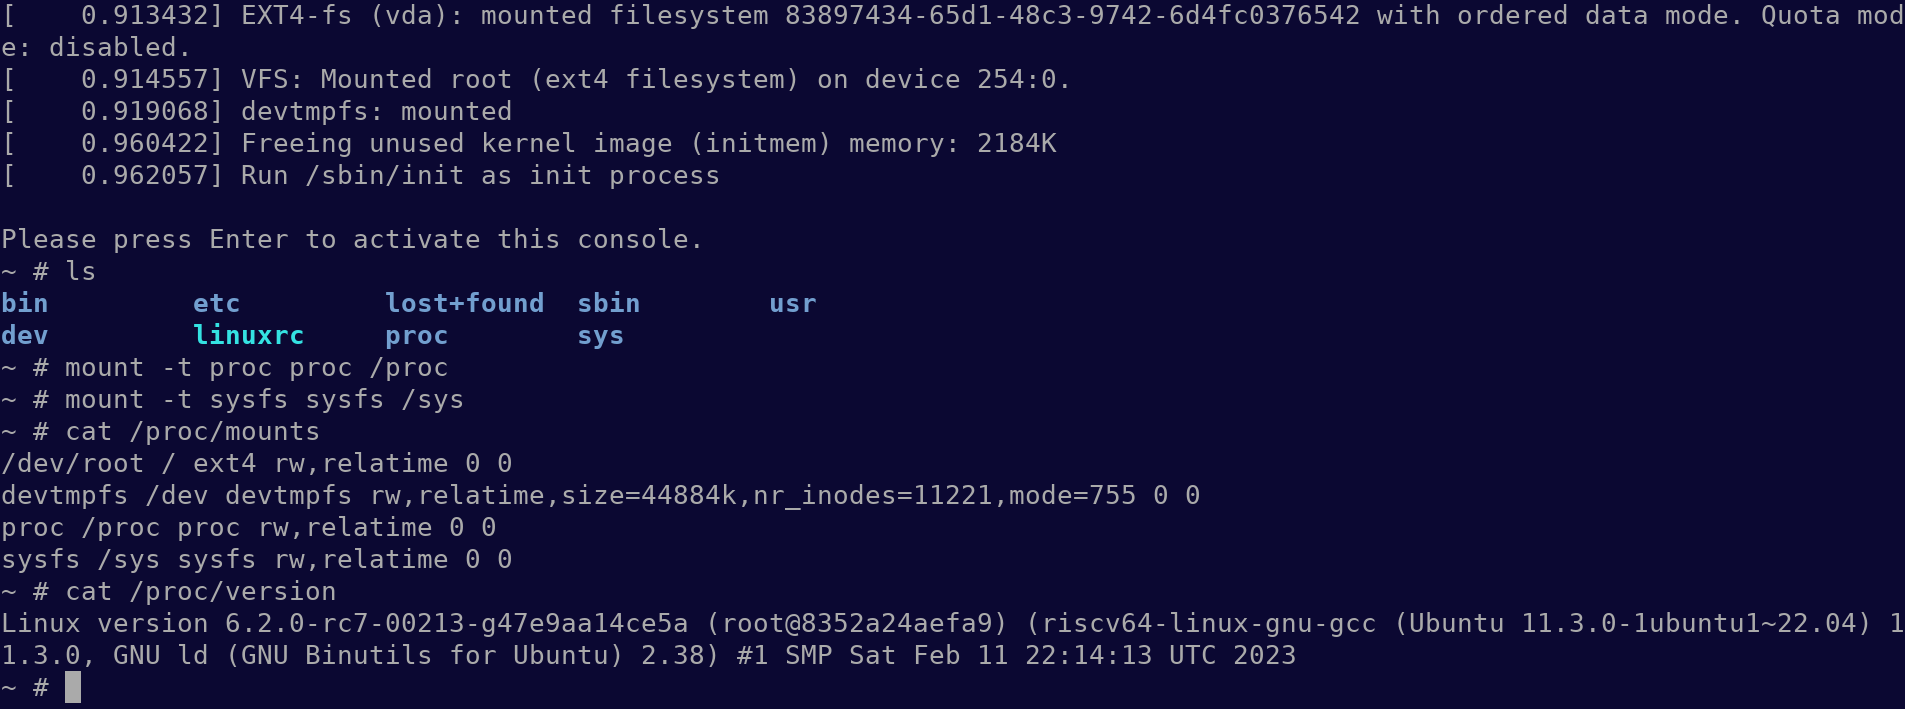
The VirtIO block device (-device virtio-blk-device) as /dev/vda gives the guest access to rootfs.img on the host. This time / is mounted, init is started and we have access to the filesystem and basic programs like cat and ls:
Inspecting a device tree
DTS (Device Tree Source) is a text-based format used to describe the hardware architecture of a device. DTB (Device Tree Binary) is a binary representation of the same information, which is used by the Linux kernel to configure the hardware during boot time. The DTS file is compiled into a DTB file, which is then used by the kernel to configure the hardware.
This is how the device tree can be dumped from the system we just run and then decompiled:
./qemu/build/qemu-system-riscv64 -machine virt -machine dumpdtb=qemu-riscv64.dtb
dtc -I dtb -O dts -o qemu-riscv64.dts qemu-riscv64.dtb
For example, there are 8 entries in qemu-riscv64.dts like the following:
virtio_mmio@10008000 {
interrupts = <0x08>;
interrupt-parent = <0x03>;
reg = <0x00 0x10008000 0x00 0x1000>;
compatible = "virtio,mmio";
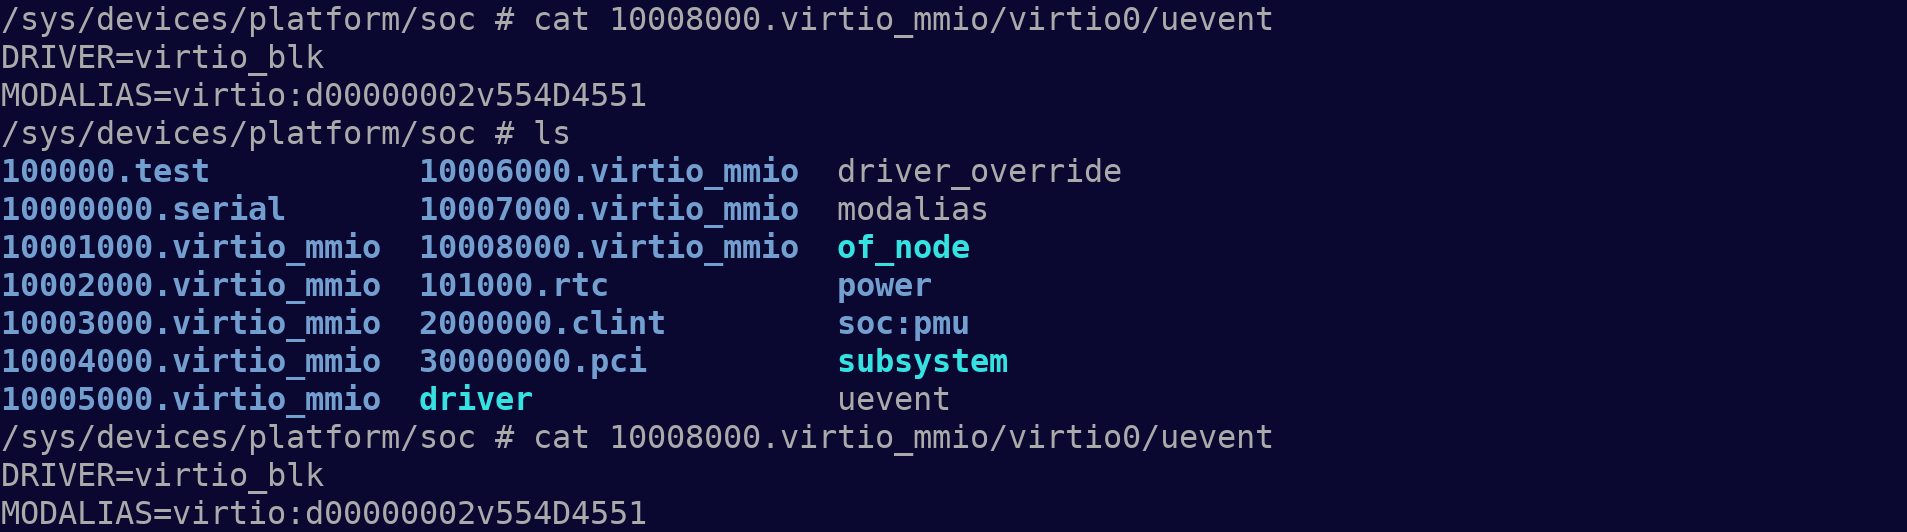
};They help Linux kernel to find VirtIO devices such as virtio-blk:
Conclusion
We have emulated a 64-bit RISC-V system on QEMU and ran Linux and BusyBox on it. We have explored how to setup tools, build the Linux kernel, QEMU and BusyBox for the 64-bit RISC-V target. We even touched the DTS a little bit. There are important steps towards getting familiar with the RISC-V architecture.